G1972
Standard Operating Procedure for E. coli O157:H7 Sampling on Beef Carcasses
Beef carcasses can become contaminated with E.coli O157:H7 during slaughter and this sampling procedure can be used to verify the process controls used to prevention contamination.
Ben Williams, Graduate Student
Dennis E. Burson, Extension Meat Specialist
Introduction
There are various ways beef carcasses can become contaminated with E. coli O157:H7, with de-hiding and evisceration being the main areas of concern during the slaughter process. Processors must be aware of the food safety hazard E. coli O157:H7 poses and consistently perform slaughter practices with sanitary procedures. Because E. coli O157:H7 appears to be more prevalent today, conducting carcass sampling procedures to validate antimicrobial interventions and good slaughter practices is imperative to the safety of the food we eat. These procedures outline one method of carcass sampling for E. coli O157:H7.
Materials
- Sterile specimen sponge in sterile Whirl-Pak® bag
- Prechilled 25 ml sterile sampling solution (Butterfield’s phosphate diluent [BPD] or sterile buffered peptone water [BPW])
- Template for 100 cm2 sampling area
- Sterile gloves
- Sanitizing solution
- Small tote or caddy for carrying supplies
- Wheeled ladder, platform, step ladder, or step stool
- Permanent marker or preprinted labels for sampling bags
- Tags for marking sides of carcasses
- Cooler with blue-ice packs
Sampling Information
Collecting the E. coli O157:H7 sample will occur after overnight chilling. A random carcass will be selected for sampling.
- Record date, time, and carcass identification on the sampling data sheet.
- Collect the sample from one carcass side.
- Place sealed samples into a clean cooler with blue ice gel packs or in refrigeration.
- Place a prelabeled tag on the carcass side to identify which side was sampled.
- Place a HOLD tag on carcass until test results return.
E. coli O157:H7 Sampling Procedure
The total area for sampling is approximately 8,000cm2, which includes the inside and outside round, along with the navel-plate-brisket-foreshank area (Figure 1). (This method of sampling was proposed by Arthur et al. in a 2004 paper titled “Escherichia coli O157 Prevalence and Enumeration of Aerobic Bacteria, Enterobacteriaceae, and Escherichia coli O157 at Various Steps in Commercial Beef Processing Plants,” Journal of Food Protection, Vol. 67, No. 4, Pages 658-665.) It is important to sponge the areas in the order of least to most heavily contaminated in order to avoid spreading any contamination. Therefore, sponge the areas in the sequence indicated in this sampling protocol. Nondestructive surface sampling should be conducted as follows:
- Ensure all supplies are on hand and all bags have been prelabeled. The information needed for each sample includes the date, time, carcass ID, and carcass side. (An assistant may be helpful during the
sampling process.)
- Locate the inside round, outside round, and the navel-plate-brisket-foreshank sampling sites.
- While holding the sponge bag at the top corner by the wire closure, tear off the clear, perforated strip at the top of the bag. Open the bag. (Person 1)
- Remove the cap from the sterile BPD/BPW bottle, being careful not to touch the bottle opening. Do not contaminate the lid. (Person 1)
- Carefully pour approximately 10 ml of the sterile BPD/BPW into the sponge bag to moisten the sponge. (Person 1)
- Use hand pressure from the outside of the bag and carefully massage the sponge until it is fully hydrated (moistened). (Person 1)
- Carefully push the moistened sponge to the upper portion of the bag, orienting one narrow end of the sponge up toward the opening of the bag. Do not open the bag or touch the sponge with your fingers.
(Person 1)
- Put on a pair of sterile gloves (Person 2, with Person 1 holding the bag containing the gloves).
- Carefully remove the moistened sponge from the bag with the thumb and fingers (index and middle) of your sampling hand. (Person 2)
- Locate the navel-plate-brisket-foreshank area. (Person 2)
- Only the sponge should touch the sampling area. Take care not to contaminate this area with your hands.
- Wipe the sponge over the sampling area until the entire area has been thoroughly covered. The pressure for sponging would be as if you were removing dried blood from the carcass; however, the pressure
should not be so great as to crumble or destroy the sponge.
- Repeat step 12 for the inside and outside round, using the opposite side of the sponge used for the navel-plate-brisket-foreshank area.
- After sponging the inside and outside round, carefully place the sponge back in the sponge sample bag, taking care not to touch the sponge to the outside of the sample bag. Soak the sponge with the
remaining buffer in the sample bag.
- Press wire closures of the sponge bag together, expel excess air, then fold down the top edge of the bag three or four times. Secure the bag by folding the attached wire tie back against the bag. (Person 1)
- Samples should be refrigerated or placed into a cooler and sent to an off-site laboratory for sample analysis.
Summary
Sampling beef carcasses throughout the slaughter process is an important step in verifying the safety of beef products; however, carcass sampling should not replace lean trim for grinding or ground beef sampling because the cumulative effort of the combined procedures is most effective. Carcass sampling enables processors to verify if contamination occurs before fabrication or sometime during the fabrication process. Because E. coli O157:H7 is primarily harbored on the hide and in the intestine of the animal, sanitary slaughter practices and clean working environments play a major role in reducing the ability of E. coli O157:H7 to be transported onto the carcass.
Inside and Outside Round Area Locate the posterior aspect of the aitch bone. Draw an imaginary line toward the Achilles tendon. The point where the line intersects the cut surface of the round is the starting point for the inside round. Sample the outside round including the semitendinosus muscle, the biceps femoris muscle and the knuckle, including the area below the hock point (hook) and down to the dorsal end of knuckle. |
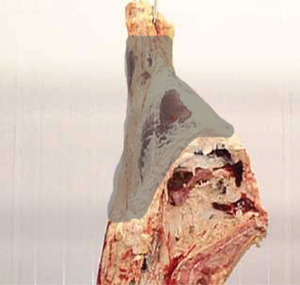 |
Midline/Brisket/Foreshank Area Locate the navel along the midline of the carcass. Draw an imaginary line straight across (medially) approximately 4 inches from the midline cut. This will be the upper (posterior) location for sampling the midline. Locate the point of the brisket (sternum) and draw an imaginary line straight across (medially). This will be the lower (anterior) location for sampling. Sample the entire area between these two lines. In addition, the entire foreshank (medial and lateral surfaces) is sampled from approximately |
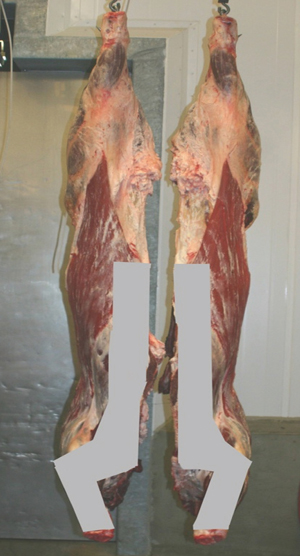 |
| Figure 1. Sampling locations for E. coli O157:H7 testing of cattle carcasses. | |
This publication has been peer reviewed.
Disclaimer Reference to commercial products or trade names is made with the understanding that no discrimination is intended of those not mentioned and no endorsement by University of Nebraska–Lincoln Extension is implied for those mentioned. |
Visit the University of Nebraska–Lincoln Extension Publications Web site for more publications.
Index: Food & Nutrition
Safety
Issued July 2010