G1570
How to Spray a Field to Prevent Overlap and Reduce Drift Injury
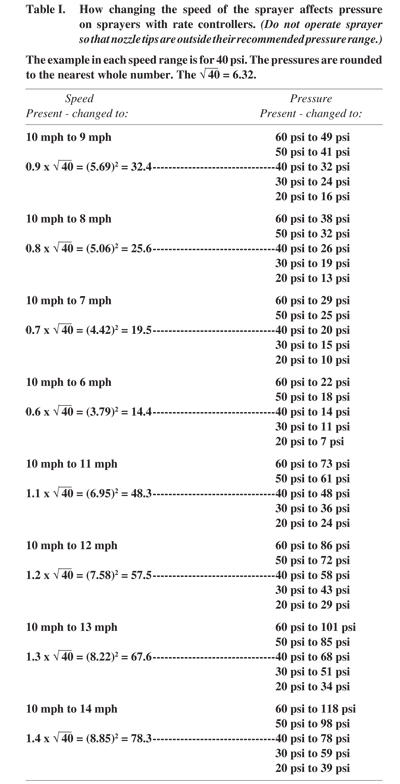
Proper spraying techniques for various situations are outlined and illustrated. A table shows how changing the sprayer speed can affect pressure on sprayers with rate controllers.
Robert N. Klein, Extension Western Nebraska Crops Specialist
- Global Positioning Systems (GPS)
- Controlled Traffic
- Fields With Rows
- Fields Without Rows or When Not Following the Rows
- Spraying Field Borders
- Spraying While Turning
- Handling Irregular Shaped Fields
- Check Areas or “Strips”
- Proper Swath Overlap
- Treating the Field
- Reducing Drift Injury
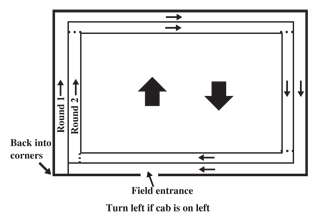
The method used to spray a field can affect pest control and potential crop injury to the targeted crop and adjacent crops. Start spraying a field on the side where the drift potential is greatest when wind speeds are low or blowing away from the susceptible area. Sometimes an applicator may need to return to a site later to spray when weather conditions are more favorable and would not cause spray drift. These factors should be considered and can make a difference on how you start and stop spraying a field (see Figure 1).
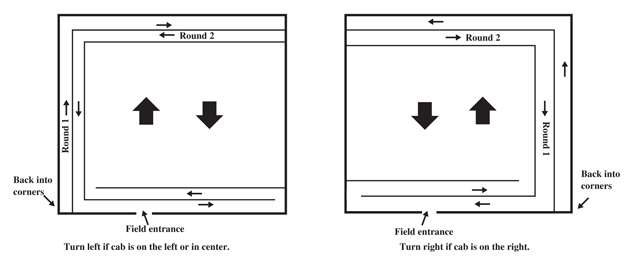 |
| Figure 1. How to start spraying a field — spraying three sides. |
Global Positioning Systems (GPS)
Many applicators/producers now use Global Positioning Systems (GPS) for sprayer application guidance. The advantages of GPS over foam and other markers include:
- GPS is usually more reliable and accurate.
- New GPS systems are usually easy to use.
- GPS can be used under low light, at night, low temperatures, low humidity, and on large fields.
Other GPS advantages include no mixing, no effect from wind or boom bounce, reduced set-up time, and reduced operator fatigue and eye strain. Much of the following test applies to both GPS and other marking systems used for sprayer guidance.
Controlled Traffic
Controlled traffic reduces soil compaction and can maximize the benefits of no-till. With controlled traffic all field operations such as planting or seeding, fertilizer application, spraying, harvesting, and grain carts use the same traffic rows. For example, the same 120-inch spacing would be used on all equipment and tractors. Duals are discouraged since they compact both sides of a row in row crop farming.
Fields With Rows
In fields with rows, usually it is best to follow the rows and set the sprayer and planter to the same row spacing. For example, with 30-inch rows and 6-, 12-, 18- and 24-row planters, sprayers with boom lengths of 30, 45, 60, 75, 90, 105, and 120 feet work best. With 30-inch rows and 8-, 16- and 24-row planters, sprayers with boom lengths of 40, 60, 80, 100 and 120 feet work best. Do watch for narrow and wide guess rows. In some situations with row widths less than 22 inches and wide sprayer tires, growers will spray perpendicular to rows so the tires cause less crop damage. In most situations two passes are needed on each end of the field to provide space for the sprayer to slow down, turn around and get back up to speed.
|
Fields Without Rows or When Not Following the Rows
When not using rows, start by spraying the ends and one side of the field with two initial rounds on three sides of the field. This will provide turning room for the tractor and sprayer. Spraying the ends first allows one to go around trees, power poles, guy wires and other obstructions, but requires backing into the corners for complete coverage (see Figure 1). If wind is blowing in the direction of susceptible crops, avoid spraying these areas until conditions permit. Use previous wheel tracks as an approximate marker, depending on the length of the sprayer and whether the booms are positioned on the rear of the sprayer. In most situations shut off booms as front wheels cross the previous wheel tracks. Another method is to spray all four sides (see Figure 2). The disadvantage of this is that a partial boom width often occurs in the last pass and many times the foam mark or other mark has disappeared before the applicator returns to that side of the field. Also, even with GPS, applicators can forget that they already made two passes on the other side of the field.
Spraying Field Borders
Field borders are visible to the public and an important part of the field. The presence of poor crops, damage from weeds, herbicides, insects, and pesticides or nutrient deficiencies along field borders presents a bad appearance. Many factors can increase the potential for problems in field borders, including:
- trashy conditions next to a fence line with minimum tillage;
- weed and insect pressure from fence rows;
- higher potential for overlaps and skips;
- soil compaction from turning and frequent traffic;
- high soil pH from overapplication of lime or dust from a nearby crushed limestone road (high pH increases crop injury from triazine and sulfonylurea herbicides); and
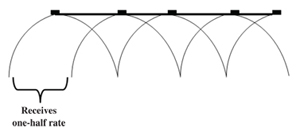
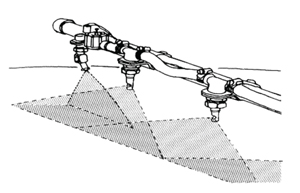
- inconsistent sprayer application. (The outer most sprayer nozzles along the field edge will not apply a full pesticide rate (Figure 3) since most nozzles are designed for some pattern overlap. To avoid this, add a nozzle at the end of the boom (Figure 4) that can be turned on to give a full rate on field borders.
 |
 |
|
| Figure 3. Shows one-half rate of pesticide from end nozzle. | Figure 4. An additional nozzle on the end ensures that a full rate of pesticide is applied. This configuration should only be used on ends and field borders and must be turned off when swathing (spraying field). |
Use an off-center nozzle at the end of the boom to provide 100 percent overlap. For example, spraying systems OC, an Air Induction Underleaf Banding Spray tip (AIUB), or an Underleaf Banding Spray tip (UB) could be used at the end of the boom to provide 100 percent overlap. Most sprayer tip companies have nozzle tips like these. Ideally these nozzles are one-half the size of other nozzles. Select the nozzle tip based on boom height and spray volume.
Spraying While Turning
Spraying while making sharp turns (Figure 5) can result in three to four times the desired pesticide rate along the inner boom and as high as 40 to 50 times in the pivot position. The rate of pesticide near the outer end of the turn can be 1/2 to 1/10 the desired rate. To eliminate this as much as possible, spray in a straight line and eliminate turning while spraying.
Handling Irregular Shaped Fields
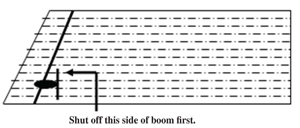
Achieving pesticide coverage of point rows is difficult. Following are some guidelines for improving results. Do you prefer to overlap applications on irregular areas or leave these areas untreated? Often these areas are difficult to cultivate and many would rather risk crop injury from overlapping pesticides than inadequate weed control. In the case of point rows or uneven row lengths (Figure 6), applicators do not always select the longest distance of travel. Consider the degree of angle into the point and minimize double spraying. Placing switches on each boom section or even on every two or three nozzles allows controlled treatment of narrow swathes on terraces, point rows and other irregular areas.
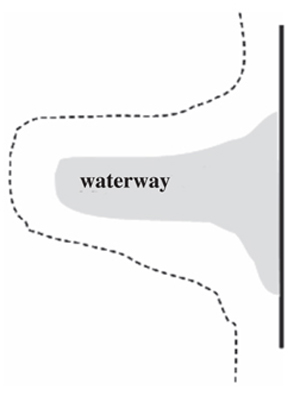
Should fence rows, waterways, terrace back slopes, and other areas be treated? Treating terraced fields can be very difficult. Farmable terraces often are sprayed as normal fields with the applicator traveling over the terraces. Other types of terraces, parallel and non-parallel, require one border along each terrace. The points between the terraces are filled in as necessary. Operating foam markers on both ends of the boom can prevent excessive double spraying. In irregularly shaped fields avoid using pesticides that could cause carryover concerns or water quality problems if applications were overlapped.
 |
 |
|
| Figure 5. Problems can develop from spraying while making sharp turns. It would be better to turn off the sprayer and back into a corner. | Figure 6. Spraying uneven row lengths. |
Check Areas or “Strips”
Untreated areas (checks) are invaluable for later evaluation of a chemical or fertilizer application. Often, a planned check area provides the only means of evaluating results in terms of pest control, crop injury, or fertilizer effectiveness. Checks are especially essential when using new products or the value of the treatment is uncertain.
The check area:
- should be used with the grower’s consent;
- is often placed in an area not readily visible to the passerby;
- need not be large — a few feet the length of the boom or spreader is usually sufficient; and
- should be identified on the field record sheet.
Proper Swath Overlap
Nozzle pattern overlap at the end of the boom should be the same as for the rest of the nozzles along the boom (Figure 7). For example, if the overlap is 100 percent along the boom, the overlap at the edge of the swath should be 100 percent. The increased overlap of spray pattern and wider nozzle spacing increases the distance with a double rate or no rate of pesticide.
 |
| Figure 7. The advantage of more overlap with the spray pattern and wider nozzle spacing when swathing. |
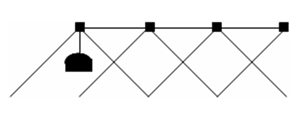
The location of a foam marker can affect the positioning of the end of the boom relative to the foam. In the following example, the marker is placed at the end of the boom, even with the last nozzle. If the nozzle spacing is 30 inches, one would move over 30 inches from the foam mark (see Figure 8).
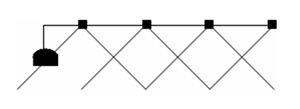
Some sprayers have the foam marker placed on an extension that is 50 percent of the nozzle spacing. In this situation one would have the foam marker directly above the foam on the return pass (see Figure 9).
 |
 |
|
| Figure 8. With a foam marker located with the last nozzle, one must move over the width of the nozzle spacing. | Figure 9. With a foam marker located one-half the distance between nozzles beyond the end nozzle, the marker is directly over the foam. |
 |
Treating the Field
Wind Direction. Be aware of nearby crops and the drift potential of the pesticides, fertilizers, etc. Doubling the wind speed (7 to 14 mph) will increase the amount of pesticide 90 feet from the sprayer by 700 percent.
Field Speed. Base your field speed on the slowest speed that the most difficult to negotiate part of the field will permit. This will avoid wide variation in speed which makes uniform application difficult.
Driving too fast:
- increases boom bouncing and whipping;
- distorts pattern (for example, at 12 mph wind will decrease the pattern width by 15-20 percent for a nozzle placed at a height of 4-5 feet);
- creates a wind eddy behind the machine; this can be a serious problem behind large machines driven at high speeds; and
- creates more dust which deactivates certain herbicides.
Reducing Drift Injury
With a rate controller that changes output by pressure, drift may be reduced by slowing down near susceptible vegetation. For example, if an applicator is spraying at 10 mph and 40 psi and slows to 7 mph, the pressure should drop to 20 psi. One needs to stay above the minimum operating pressure for the nozzle tip being used (see Table I). This table also shows how pressure is affected as speed increases. When using the table for speeds other than 10 mph, use a percentage. For example if you travel 7 mph use 70 percent, and if you travel 12 mph use 120 percent.
The boom height also can be lowered when going slower. Boom height is the second biggest factor in drift — wind is first. These two factors, reducing pressure and lowering the boom, are two big steps in reducing drift while spraying fields. Boom height must be kept at a minimum height so that patterns will have the correct overlap.
This publication has been peer reviewed.
Visit the University of Nebraska–Lincoln Extension Publications website for more publications.
Index: Field Crops
Cropping Practices
2005, Revised February 2012
