G2025
Controlling Pond Plant Growth with Bottom Barriers
Although plants are an important part of a lake’s ecosystem, it’s important to control their growth to assure a healthy, aesthetic environment. This NebGuide offers ideas for controlling plant growth.
Tadd M. Barrow, Extension Educator — Water Quality
- What Is a Bottom Barrier and Where Do I Put It?
- When and How to Install Barriers
- Best Time for Installation
- Advantages
- Disadvantages
- Acknowledgment
|
Rooted aquatic plants are a natural part of the lake ecosystem and comprise a critical component of a healthy lake. They stabilize shorelines, oxygenate water, provide cover and spawning areas for fish, and provide habitat for aquatic invertebrates that are critical for juvenile fish growth. Uncontrolled plant growth, however, quickly can overtake swimming beaches, impede boating access around docks, limit angler success, and may result in an aesthetically unwelcome situation. When excessive vegetation growth affects the recreational and economic potential of a lake, it may be desirable to directly control rooted aquatic vegetation. Typically, this is accomplished through hand removal or the application of herbicides. Bottom barriers, however, provide an alternative method that avoids the environmental, health, social, and economic concerns that can be associated with chemical treatments.
What Is a Bottom Barrier and Where Do I Put It?
Bottom barriers are sheets of synthetic or natural material anchored to the bottom of the lake to obstruct sunlight, which controls the growth of aquatic plants. The concept is comparable to using landscape fabric to control weed growth around ornamental bushes and plants in residential yards. Bottom-barrier treatments are intended for small areas of a lake and are most commonly installed in high use areas such as swimming beaches, docks, and boat ramps. The barrier can also be installed to create edge habitat for predator fish such as largemouth bass, bluegill, and crappie. Predator fish that are popular with anglers commonly reside along weed edges. Bottom barriers increase the amount of edge habitat within a lake and may increase angler success.
A variety of “bottom barrier” or “screen” products are available to suppress aquatic plant growth by reducing or blocking light. Ideally, bottom barriers should be heavier than water but porous enough to allow gas bubbles produced by bottom sediments and decomposing plant material to pass through the barrier without “ballooning” the material off the bottom. Plastic sheeting products such as tarps or hog lagoon liners should be avoided because they are nonporous and difficult to install. Burlap is inexpensive and porous, but it is a natural fiber that decomposes and may lose its effectiveness within two years. Geotextile fabric products are superior to burlap or plastic sheet liners as they are rot-, tear-, and puncture-resistant, permeable enough to allow gas evacuation, and have a density greater than water.
When and How to Install Barriers
Bottom barrier installation is easiest in the spring before the plants are well established. If installation must take place later in the year, aquatic plants should be hand pulled or cut prior to installation. Barriers installed in areas with minimal vegetation are the most likely to remain in place and avoid disturbance from ballooning. Bottom barriers will typically kill the plants under them within one to two months, after which the barriers may be removed or moved to other areas. Barriers can be left in place for annual weed suppression.
Installation of the bottom barriers requires considerably less effort if the sediments are exposed and dry. Exposed sediments typically occur before filling a newly constructed pond, during periods of draw-down, or in drought years. However, installation when the pond is at full pool is the most common technique.
Installation of the barrier material simply requires rolling it out and anchoring it to the pond bottom sediments. It is important to anchor the barriers, because even porous materials will balloon when gas from decomposing plants is produced underneath the barrier. For anchoring, 1/2 inch diameter rebar can be placed through loops or hems constructed (with waterproof thread) on the edges of the material. However, placing rocks and/or bricks every 3 feet along the edges and every 5 feet in the middle of the material is also quite effective and is the easiest anchoring method. Installation in deeper water becomes more difficult and likely will require snorkeling equipment or scuba gear.
Alternatively, the barrier material can be stapled to frames constructed of 2-by-2 inch lumber. The corners of the frames are then anchored with bricks or sandbags and left in place for one to two months to achieve effective control of the vegetation. The frames can then be moved to other locations around the lake or removed and stored until the following year. Frames should be a manageable size (approximately 12 feet by 12 feet) and the placement of hinges at midpoint of the frames will allow them to fold to 6 feet by 12 feet for easier winter storage. Several frames can be placed next to each other to control vegetation in larger areas.
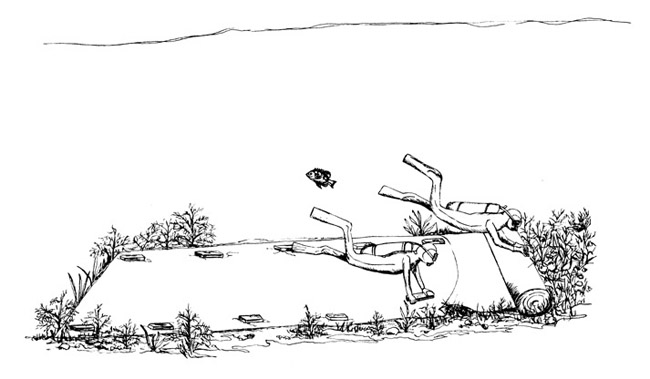 |
| Figure 2. Scuba divers rolling out and anchoring with bricks the material, creating a plant free substrate. |
Best Time for Installation
- During construction of the lake
- During periods of draw-down
- During times of drought
- Before vegetation becomes established (spring)
Advantages
- Ideal for small applications
- Bottom screens are relatively easy to install by homeowners
- Can target high use areas such as swimming beaches, boat ramps, and docks
- Creates important edge habitat for fish
- An alternative to chemical control
- If cared for properly, can be used over multiple seasons
Disadvantages
- Expensive for treating large areas
- Can be difficult to install in deep areas and may require divers
- Boat anchors, heavy swimming use, dredges, weed harvesters, etc. may damage materials
- Can be difficult to anchor in deep muck sediments
- In time, sediments can build up on top of the mat, allowing plants to colonize
- Wave action from wind or boat use could dislodge it if not properly anchored
Acknowledgment
Special thanks to John C. Holz for his contributions to the original draft of this publication.
This publication has been peer reviewed.
Disclaimer Reference to commercial products or trade names is made with the understanding that no discrimination is intended of those not mentioned and no endorsement by University of Nebraska–Lincoln Extension is implied for those mentioned. |
Visit the University of Nebraska–Lincoln Extension Publications Web site for more publications.
Index: Wildlife Management
Ponds and Streams
Issued September 2010